Wednesday, 19 October 2011

How to spy or hack a computer ?... download Sniper spy

0 comments

How to spy a computer - download Sniper spy

If you want to spy on a computer without having physical access to it. I have a best tool for you for this.  Download SniperSpy and enjoy it's features . SniperSpy is the industry leading Remote password hacking software combined with the Remote Install and Remote Viewing feature.
Once installed on the remote PC(s) you wish, you only need to login to your own personal SniperSpy account to view activity logs of the remote PC’s!  


This means that you can view logs of the remote PC’s from anywhere in the world as long as you have internet access. This Remote PC Spy software also saves screenshots along with text logs of chats, websites, keystrokes in any language and more. Remotely view everything your child, employee or anyone does while they use your distant PC. Includes LIVE admin and control commands.

No physical access to your remote PC is needed to install the spy software. Once installed you can view the screen LIVE and browse the file system from anywhere anytime. You can also view chats, websites, keystrokes in any language and more, with screenshots.
This software remotely installs to your computer through email. Unlike the other remote spy titles on the market, SniperSpy is fully and completely compatible with any firewall including Windows XP, Windows Vista and add-on firewalls.
The program then records user activities and sends the data to your online account. You login to your account SECURELY to view logs using your own password-protected login. You can access the LIVE control panel within your secure online account.

SniperSpy Features:

1. SniperSpy is remotely-deployable spy software
2. Invisibility Stealth Mode Option. Works in complete stealth mode. Undetectable!
3. Logs All Keystrokes
4. Records any Password (Email, Login, Instant Messenger etc.)
5. Remote Monitor Entire IM Conversations so that you can spy on IM activities too
6. Captures a full-size jpg picture of the active window however often you wish
7. Real Time Screen Viewer
8. Remotely reboot or shutdown the PC or choose to logoff the current Windows user
9. Completely Bypasses any Firewall


Download Here:
http://sniperspy.en.softonic.com/


warning: download at your own risk. I will not be responsible for any harm.
Read More ->>

Sunday, 20 March 2011

Blog "TP's Hack World" is Back Again

0 comments

Dear friends nad Hackers,

Sorry Friends, because I'm Closed my "Way 2 hack" & "Ethical hacking | Cracking | Web Hacking Articles" Blogs. Now I'm only working in this ("TP's Hack World") Blog. This Blog is Gives you Internet, Computer & Hacking Tricks, Hacking Tools, Hacking Softwares, Hacking News, Serial Keys, E Books n much more....

So, Follow this Blog & Give Support me....

Someone Hack this ("TP's Hack World") Blog, but now I'm again with more Potentials and Skills. I know many of you tried Killing my Existance and gave me bad to worst time. As I always said I am here for you, take it or leave it its your choice. I have never ever damaged any hacker so far and will never do so. I hate giving Expalnations.

Can I ask What is my crime and why will I confess or surrender when I have not done anything wrong. My fundas of life is very clear, I respect you all for what ever you are and who so ever you are..
Please stop it..
I am back.
 
Read More ->>

Thursday, 30 December 2010

How To Repair Your Corrupted Windows System Files for Windows XP

0 comments

How To Repair Your Corrupted Windows System Files for Windows XP

There are times when for some unknown reasons, the registry entries or system files get corrupted.

Here is one method of restoring those files using a program called 'webfldrs.msi' without reinstalling the whole of Windows. The program is located right there on your PC and can be run from c:\windows\system32\webfldrs.msi

If it's not on your system, you can download it from here:-


RAPIDSHARE

STEPS INVOLVED:
- Insert your Windows XP CD into your CD-ROM
- Run webfldrs.msi

You will see the following dialogs. Just follow the instructions.


Thats All The Procedure to recover from corrupted Files...

Read More ->>

5 Things You Didn’t Know Google Could Do

0 comments

Google is widely known as the Internet’s best search engine. Everybody with access to the internet uses Google at some point to find something (or many things) on the web for a particular web page, or a certain piece of information.
However, Google has several built in functions that will help you make your searches more successful, and to enable you to spend less time searching. I have written a post about some tricks that will help you with your image search and that will ‘give you the power’ to Find Images by Exact Dimensions, File Type or From Specific Website. That should make your search for new wallpapers that perfectly fit to your screen resolution as easy as walk in a park.

But today I’ve decided to expand that post and to tell you about a list of 5 functions that you did not know before (I think), all accessible from the main Google search box (frontpage), which will help youfind every piece of information you are looking for.

1. Removing unwanted (unrelated) results:

google-search-tips
Ever searched for something before, and had a whole list of completely irrelevant web pages come up? This is annoying at the best of times, as it takes time to check and read through the list of sites and find the one you actually want.
For example, if you were looking for a review of the book “Harry Potter” (whatever part of it), and you typed into Google “Harry Potter review”, many of the links listed are reviews of the movie, not the book. Because you are not looking for a review of the movie, you can remove all pages related to the movie by adding “-movie” to the end of your search terms.
This will now display all the pages relevant to “Harry Potter review“, but not relevant to ” Harry Potter movie”.

2. Use Google as an excellent Calculator:

google-search-calculator
Google can be used as a calculator, answering anything from the simplest math to the most complex equation. Just enter your math question, and Google will display the answer. (Damn, I wish I knew this earlier)
+ is used to add terms, - to subtract terms, * to multiply terms, and / to divide terms. Besides these basic operators, you can use ^ to work out something to the power of something (for example, “2^4” would be 2 to the power of 4), and “sqrt“ (without quotation marks) to calculate the square root of a number (for example, “sqrt 4” would be the square root of 4).

3. Find Dictionary Definitions

google-search-dictionaryBy typing “define:” before a word, Google will retrieve and display a list of dictionary definitions for that word. Very useful function…

4. Search A Single Website

google-search-site
If you type “site:” and then a website after a search term, Google will search for your term(s) in only the site dictated. For example, the following search will search the keyword “Windows 7″ only this blog.

5. Search for A Specific File Type:

google-search-filetype
As I am sure you are aware, there are many files hosted on the internet besides the standard ‘html websites’. Therefore, searching for a specific type of file could make your search a lot easier. For example, if you were looking for a PDF version of the iPhone manual, you could use the following search, which would produce more accurate (and less) results.
Here the “filetype:” tool is making Google search the web for PDF files only, therefore eliminating any pages that we didn’t want to see.
These are just 5 useful functions that Google can perform, there are many more for you to discover, and they can all be mixed and matched! If you know some more functions post them in comments and share with others. I hope this helped you to find that ever-elusive page or snippet of info. Have fun, and happy searching!

Read More ->>

3 Hacks for Firefox That Will Double Your Internet Browsing Speed

0 comments


There are many people out there complaining about the Firefox RAM Memory Bug. Lets get it straight. It’s not a bug. It’s part of the cache feature. This ‘feature’ is how the pages are cached in a tabbed environment.

To improve performance when navigating (studies show that 39% of all page navigations are renavigations to pages visited less than 10 pages ago, usually using the back button), Firefox implements a Back-Forward cache that retains the rendered document for the last five session history entries for each tab.
This is a lot of data. If you have a lot of tabs, Firefox’s RAM memory usage can climb dramatically. It’s a trade-off. What you get out of it is faster performance as you navigate the web.
Now a lot of us have found the ’secrets’ on how to manipulate settings in “about:config” to drop the memory usage as long as possible and to increase the speed at which Firefox loads sites. Read on to find out how to do this.
Remember: Firefox (download it here) is the best internet browser available (in my opinion), and these tweaks below will make it even greater and faster. So enjoy!

Reduce the amount of RAM Firefox uses for it’s cache feature

Here’s how to do it:
1. Type “about:config” (no quotes) in the adress bar in the browser.
2. Find “browser.sessionhistory.max_total_viewer”
3. Set it’s value to “0“;(Zero)

Increase the Speed in Which Firefox loads pages

1. Type “about:config” into the address bar and hit Enter.
(Normally the browser will make one request to a web page at a time. When you enable pipeliningit will make several at once, which really speeds up page loading.)
2. Alter the entries as follows:
Set “network.http.pipelining” to “true”
Set “network.http.proxy.pipelining” to “true”
Set “network.http.pipelining.maxrequests” to some number like 10.
This means it will make 10 requests at once.
3. Lastly, right-click anywhere and select New-> Integer. Name it “nglayout.initialpaint.delay” and set its value to “0“;.(Zero)
This value is the amount of time the browser waits before it acts on information it receives. If you’re using a broadband connection you’ll load pages faster now.
Optionally (for even faster web browsing) here are some more options for your about:config (you might have to create some of these entries by Right Click –> New– > Interger or String
network.dns.disableIPv6: set “false” 
“content.notify.backoffcount”: set “5“; (Five)
“plugin.expose_full_path”: set “true”.
“ui.submenuDelay”: set “0; (zero)

Reduce RAM usage to 10mb when Firefox is minimized:

This little hack will drop Firefox’s RAM usage down to 10 Mb when minimized:
1. Open Firefox and go to the Address Bar. Type in about:config and then press Enter.
2. Right Click in the page and select New -> Boolean.
3. In the box that pops up enter “config.trim_on_minimize”. Press Enter.
4. Now select True and then press Enter.
5. Restart Firefox.
These simple tweaks will make your web browsing with Mozilla Firefox 2-3 times faster and easier. And I think they are fairly easy to apply. Enjoy!

Read More ->>

Make Windows XP Boot-Up Faster With A Quick Registry Hack

0 comments


Let’s get straight to the point. This Windows XP registry tweak will make your system boot much faster. How much?
I can not say exactly how much faster, since it all depends on your computer specifications (processor, RAM, hard-drive and stuff like that…), but from my experience, this tweak decreased the time to boot-up for about 9-10 seconds.
Now you see how great this registry tweak is and it will get even better when you see how simple it is to apply. I will do my best to show you step-by-step and make it plain simple and of course with screenshots included.

How to make Windows XP start faster:

1. Click on “Start” on the taskbar.
2. Click “Run” located in the start menu.

3. Then in the “Run” panel, type: “regedit” without the quotation marks. (that will open up the Windows registry editor)
4. Then click on “HKEY_LOCAL_MACHINE” and expand it.
hkey_local_machine
5. Then click on “SYSTEM” and expand it.
6. Then scroll down, and expand “CurrentControlSet”.
7. Under that, expand “Control”.
8. Then, under that one, locate and click on “ContentIndex”. (so when you click on it, it needs to be highlighted and it’s options need to show up in the right panel of Windows XP Registry Editor)
So to sum up, here’s where you need to navigate to:
HKEY_LOCAL_MACHINE \ SYSTEM \ CurrentControlSet \ Control \ ContentIndex
windows-registry-path
Let’s continue… You have just 6 more steps until the finish line!
9. When you have clicked on “ContentIndex” and it is highlighted and you see the options and parameters on the right side of the panel… Among those, you need to scroll all the way to the bottom and find the Registry key named “StartupDelay”.
10. Double-click on it and a new window panel will pop-up.
11. The new window has a field to enter value (and a default value entered already). But before you change the value, you need to change the base from Hexadecimal to Decimal. Take a look at the screenshot below to see what I am talking about:
startupdelay
Now when you change it to Decimal, it displays a different value (480000 instead of 75300).
12. So now, all you need to do is change the value from “480000” to “40000” (forty thousand)
Many people ask me if they can change it to an even smaller value than 40000, but I would not recommend doing that. I tested it and it doesn’t work. I did not feel any difference in boot-up time when I change it to value less than 40000 (and no, you can’t put 0 either).
13. After you’ve completed all the steps above, click “OK” and close the Registry Editor.
And one just one little thing you need to do to finish all this registry tweaking…
14. Restart your computer.
Now you can notice big difference in time that your system takes to boot-up. Mine was faster for 10 seconds than usual. 

Read More ->>

Wednesday, 29 December 2010

Extend the Windows 7 Trial from 30 to 120 Days

0 comments

Did you know that you can install Windows 7 without any license key and use it for 30 days? What you might not know is that you can also extend that trial mode to 120 days, without requiring a key.
The basic way this works is that at the end of the 30 days, you’ll need to run a small command and reboot your computer, at which point you’ll have 30 more days, up to a maximum of 120 days. This trick should work regardless of where you got your copy of Windows 7 from.
Extending the Trial By 30 Days
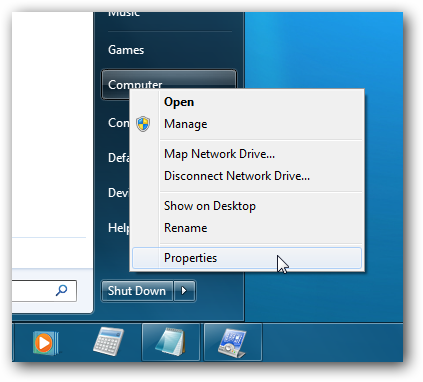
The first thing you’ll want to do is check how many days are left in your trial period. You can do this by right-clicking Computer and choosing Properties…
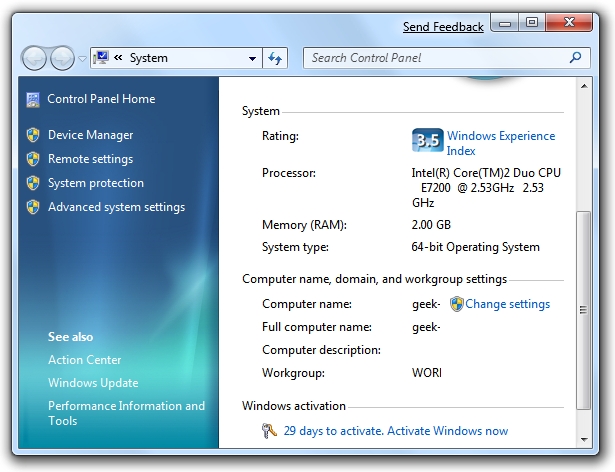
At the bottom of this window you’ll see how many days are left to activate (29 in my case since I installed this box yesterday).
Now to actually perform the hack that will extend the trial mode, you’ll want to find Command Prompt in the start menu (or search for it), and then right-click on it and choose Run as administrator. (very important)
Windows 7 Command Prompt as Administrator
Next you’ll simply type in this command:
slmgr -rearm
Windows 7 slmgr rearm
Within a few seconds you’ll normally see this dialog show up, saying that the command has completed successfully, at which point you’ll want to reboot.
Windows 7 slmgr Success
Checking the system properties again shows that I now have 30 days left to activate.
Windows 7 Activation 30 days
Of course you’d normally want to do this near the end, probably on the last day before activation. I’m pretty sure that you can even perform this trick after the 30-day trial expires, although I’m not certain yet.


Read More ->>
 

| Computer Hacks and Tricks © 2012. All Rights Reserved | Template Style by TP's Hack World | Design by Tushar Patel | Back To Top |